
- The entire RNI registration process — from title selection to certificate download — now runs online on the Press Sewa Portal no physical visits to any government office are needed.
- Three separate portal logins are involved: the Owner (who books the title), the Publisher (who files the main form), and the Printer (who confirms the printing press) — each must create their own profile.
- You get a 120-hour (5-day) correction window after submission, and if a title or application is rejected, you have 10 days to respond before it's closed.
- Once approved, PRGI issues a QR-code-verified digital Certificate of Registration that's instantly downloadable from the portal.
Introduction
The RNI registration process is completed entirely online through the Press Sewa Portal, the official platform of the Press Registrar General of India (PRGI). It involves five broad stages: creating an Owner profile and proposing up to 5 titles, getting the title verified, appointing a Publisher and Printer, uploading documents and e-Signing the declaration, and paying the ₹1,000 fee via Bharatkosh. Once verified, PRGI issues a digital Certificate of Registration with a QR code. The full process typically takes about 3–4 months from start to finish.
What Is the RNI Registration Process?
The RNI registration process is the official sequence of steps a person or organization must follow to legally register a newspaper, magazine, or periodical for publication in India. It was earlier a paper-heavy process involving multiple visits to the District Magistrate's office and the RNI office in Delhi. Since 1 March 2024, under the Press and Registration of Periodicals Act, 2023, this entire process has moved to a single online platform — the Press Sewa Portal, run by the Press Registrar General of India (PRGI).

If you're planning to start a newspaper, launch a magazine, or bring out a journal that carries public news or commentary, understanding this process step by step will save you weeks of back-and-forth. This guide walks through every stage — from creating your first profile to downloading your final registration certificate — in plain, practical language.
Why Understanding the Process Matters (Benefits of Getting It Right)
- Saves time: Knowing the correct sequence — Owner, then Publisher, then Printer — avoids the most common cause of delay: applications stuck because a role wasn't set up first.
- Avoids title rejection: Understanding the title verification rules upfront means you're less likely to lose weeks on a name that was always going to be rejected.
- Keeps you within deadlines: The portal gives you a strict 120-hour correction window and a 10-day response window for rejections — missing these can force a fresh application.
- Builds a paper trail: Every step, from ARN generation to e-Sign, is logged and timestamped, which protects you if there's ever a dispute about your application.
- Faster access to your certificate: A well-prepared application, submitted in the right order, moves through PRGI verification with fewer queries and objections.
Who Is Involved in the RNI Registration Process?
Unlike a typical single-applicant government form, the Press Sewa Portal process involves three distinct roles, each requiring its own login and profile. Understanding this upfront prevents a lot of confusion:
| Role | Responsibility | Creates Profile? |
| Owner | Proposes the title(s), initiates the application, appoints the Publisher | Yes — first profile created |
| Publisher | Fills the main registration form, uploads documents, e-Signs, nominates the Printer | Yes — separate profile, invited by Owner |
| Printer / Keeper | Accepts or rejects the nomination, confirms printing press details | Yes — separate profile, invited by Publisher |
| Specified Authority (District) | Verifies and endorses the declaration (DM/DC/SDM, now largely digital) | Government official — no applicant action needed |
One person can hold more than one role (for instance, the same individual can be both Owner and Publisher), but each role still needs to be set up separately on the portal.
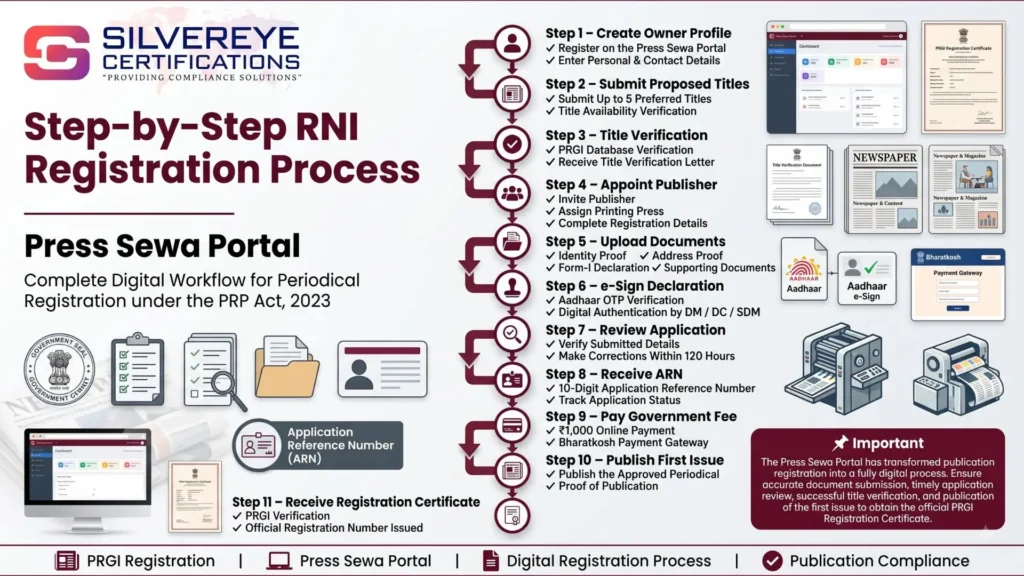
Step-by-Step RNI Registration Process on the Press Sewa Portal
Here is the complete, ordered walkthrough of how the process actually unfolds on presssewa.prgi.gov.in:
Step 1: Create Your Owner Profile
Visit the Press Sewa Portal and register as a new user. You'll need a valid email ID (used for login), mobile number, and a government ID such as Aadhaar, PAN, Passport, Voter ID, or Driving Licence. This first profile is created in the "Owner" role.
Step 2: Apply for Title Verification
- Log in and open the Title Registration / Title Verification module.
- Enter up to 5 proposed titles, ranked in order of preference.
- Select the language and proposed place of publication for the periodical.
- Submit the request — the system checks your proposed titles against the existing PRGI database for duplicates or deceptively similar names.
If your title clears verification, you receive a Title Verification Letter. If it's rejected (usually because it's too similar to an existing registered title), you generally get 10 days to respond or submit a revised option before the request is closed.
Step 3: Appoint the Publisher
Once the title is verified, the Owner nominates a Publisher through the portal — this can be the same person or someone else entirely. The Publisher receives an invite, creates their own profile, and logs in separately to continue the application.
Step 4: Fill the Main Registration Form
The Publisher completes the detailed registration form, covering:
- Periodicity (daily, weekly, fortnightly, monthly, etc.)
- Language and place of publication
- Ownership structure — individual, partnership, company, or trust
- Editor and key management details
Step 5: Nominate the Printer / Printing Press
The Publisher selects a printing press from the Press Sewa database if it's already registered there. If not, the Owner or Publisher asks the printer to create a fresh Printer profile on the portal first. The Printer then logs in and accepts or rejects the nomination — the application cannot move forward until the Printer confirms.
Step 6: Upload Documents
With all three profiles linked, the Publisher uploads the supporting documents — identity and address proof, the authenticated declaration (Form-I), photographs, and (where applicable) a board resolution or foreign NOC. A detailed document checklist for every function is available directly on the Press Sewa Portal.
Step 7: e-Sign the Declaration
The declaration is digitally signed using Aadhaar-based OTP e-Sign. Alternatively, the local Specified Authority (DM/DC/SDM) verifies and e-signs the declaration digitally and forwards it within the portal itself — removing the need for an in-person visit.
Step 8: Pay the Registration Fee
The Publisher pays the government processing fee of ₹1,000 through the Bharatkosh payment gateway, which is integrated directly into the Press Sewa Portal.
Step 9: Review Within the 120-Hour Correction Window
After submission, you have 120 hours (5 days) to review the application and fix minor errors — spelling mistakes, incorrect addresses, or document mismatches. Once this window closes, no further edits are possible, and any changes require a fresh revision application.
Step 10: Receive Your Application Reference Number (ARN)
Once submitted, the portal auto-generates a unique 10-digit Application Reference Number (ARN). This number is used for all future tracking, correspondence, and status checks with PRGI.
Step 11: PRGI & District Authority Review
Because the Press Sewa Portal is a single-window system, both the Press Registrar General's office and the Specified Authority in the relevant district can view and process the same application simultaneously — this is what has cut down the older delays caused by the file moving between separate offices.
Step 12: Download Your Certificate of Registration
Once PRGI completes verification and is satisfied that all requirements are met, it issues a digital Certificate of Registration bearing a unique RNI/PRGI number and a QR code for instant authenticity verification. The certificate is available for immediate download from your portal dashboard.
How to Track Your RNI Application Status
- Log in to the Press Sewa Portal using your registered email ID and password.
- Go to your dashboard and enter your 10-digit ARN in the application tracking section.
- The status will show where your file currently stands — under title verification, pending Printer confirmation, pending e-Sign, under PRGI review, or approved.
- For technical issues, publishers can raise a request through the portal's Online Helpdesk or the dedicated PRGI helpline.
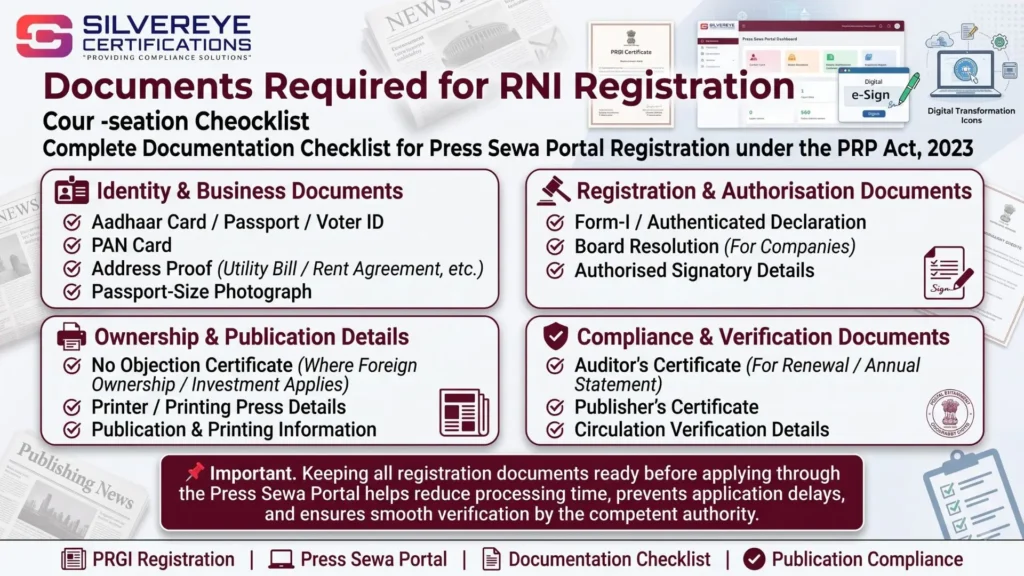
Documents You'll Need at Each Stage
| Stage | Documents Required |
| Owner profile creation | Aadhaar / PAN / Passport / Voter ID / Driving Licence, email, mobile number |
| Title verification | Proposed title list (up to 5), language, place of publication |
| Publisher registration form | Ownership proof, PAN (for companies/firms), board resolution (if applicable) |
| Declaration & e-Sign | Authenticated declaration (Form-I), Aadhaar for OTP-based e-Sign |
| Printer confirmation | Printing press registration details, printer's identity proof |
| Final submission | Passport-size photograph, NOC (if foreign ownership/investment involved) |
RNI Registration Process Fees
| Fee | Amount | Payment Mode |
| Title verification & registration processing fee | ₹1,000 | Bharatkosh (via Press Sewa Portal) |
| Application revision / correction (post 120-hour window) | As per applicable PRGI schedule | Press Sewa Portal |
| Annual Statement late filing | Penalty per year of default, per PRGI advisory | Press Sewa Portal |
Timeline: How Long Does the Process Take?
On average, the complete RNI registration process — from creating your Owner profile to receiving the Certificate of Registration — takes around 3–4 months. Title verification and Printer confirmation are usually the two stages that determine whether you're on the faster or slower end of that range.
- Fast track: Unique title cleared on first attempt, Printer already registered on the portal, complete documents, quick e-Sign.
- Delayed track: Title rejected and resubmitted, Printer profile created from scratch, missing or mismatched documents, Aadhaar e-Sign errors.
Eligibility to Start the RNI Registration Process
- Any individual, partnership, company, or trust planning to publish a periodical carrying public news or commentary on public news in India.
- Existing publishers seeking a revision (title, ownership, periodicity, or address change) also go through a similar process on the same portal.
- Printing presses that print such periodicals must also complete an intimation process on the portal within 30 days of starting operations.
Pure academic, scientific, or technical journals without public-news content are outside the scope of this process, as are purely digital-only news websites (though many still register a title for brand protection).
Validity & What Happens After RNI Registration
- The Certificate of Registration doesn't have a fixed expiry, but you must file an Annual Statement on the portal every year (typically by 31 May) to keep it active.
- Any change in title, ownership, periodicity, printer, or address must be updated through a revision application on the same portal.
- Continuous default in filing correct annual details for two consecutive years can lead to suspension of the registration under the PRP Act, 2023.
Common Mistakes That Slow Down the Process
- Starting the Publisher or Printer step before the title verification is fully cleared.
- Submitting only 1–2 title options instead of using all 5 preference slots.
- Letting the 120-hour correction window lapse without checking the application for errors.
- Aadhaar name mismatches that cause e-Sign/OTP verification to fail repeatedly.
- Forgetting to ask the Printer to accept the nomination on their own portal login.
- Not responding within 10 days when a title or application is flagged for objection.
Conclusion
The RNI registration process may look like it involves a lot of moving parts — three separate profiles, title verification, e-Sign, and document uploads — but once you follow the correct sequence on the Press Sewa Portal, it's genuinely more straightforward than the old offline system ever was. The publishers who move through it fastest are the ones who prepare their documents in advance, pick a genuinely distinct title, and stay alert to the 120-hour and 10-day windows built into the portal. Get that sequence right, and there's no real reason your application should get stuck.
Frequently Asked Questions
What is the first step in the RNI registration process?
The first step is creating an Owner profile on the Press Sewa Portal and submitting up to 5 proposed titles for verification.
How many logins are needed to complete the process?
Three separate portal profiles are typically involved — Owner, Publisher, and Printer — though the same person can hold more than one role.
How long is the correction window after submitting the application?
You get 120 hours (5 days) after submission to make minor corrections. After this, no further edits are possible on that application.
What is an ARN in the RNI registration process?
ARN stands for Application Reference Number — a unique 10-digit number generated automatically once your application and fee payment are complete, used to track your file.
What happens if my proposed title is rejected?
You're generally given a window of about 10 days to respond or submit an alternative title before the request is closed and a fresh application becomes necessary.
Can I skip the Printer registration step?
No. The Printer must have (or create) a profile on the Press Sewa Portal and formally accept the Publisher's nomination before the application can proceed to final submission.
How do I check my RNI application status online?
Log in to the Press Sewa Portal with your registered credentials, go to your dashboard, and enter your ARN under the application tracking section to see the current stage.
Is a physical visit to any government office required at any stage?
No. The entire process, including declaration authentication by the Specified Authority (DM/DC/SDM), is designed to be completed digitally through e-Sign, without requiring an in-person office visit.
How much does the RNI registration process cost?
The core government processing fee is ₹1,000, paid online through the Bharatkosh gateway linked to the Press Sewa Portal.
What do I receive at the end of the process?
A digital Certificate of Registration with a unique RNI/PRGI number and a QR code for verification, available for instant download from your portal account.
How long does the complete process usually take?
On average, about 3–4 months from the first Owner profile creation to final certificate issuance, depending mainly on how quickly the title is verified.
What should I do after receiving my registration certificate?
Keep your login credentials active, note your annual filing deadline (generally 31 May), and file your Annual Statement each year to keep the registration in good standing.